Appearance
Database Modeling
This tutorial describes how to set up a simple database model either manually via the manager application in Windows or via the API. The API can be accessed via direct HTTP requests or via the downloadable SDK libraries. The corresponding packages contain samples with the same steps as this tutorial.
For code samples using curl on the command line, a bash shell should be used (on Windows computers, this can be the git-bash included in git for Windows). In addition to standard Unix tools like sed or awk, jq is required for some commands.
Create Database Model
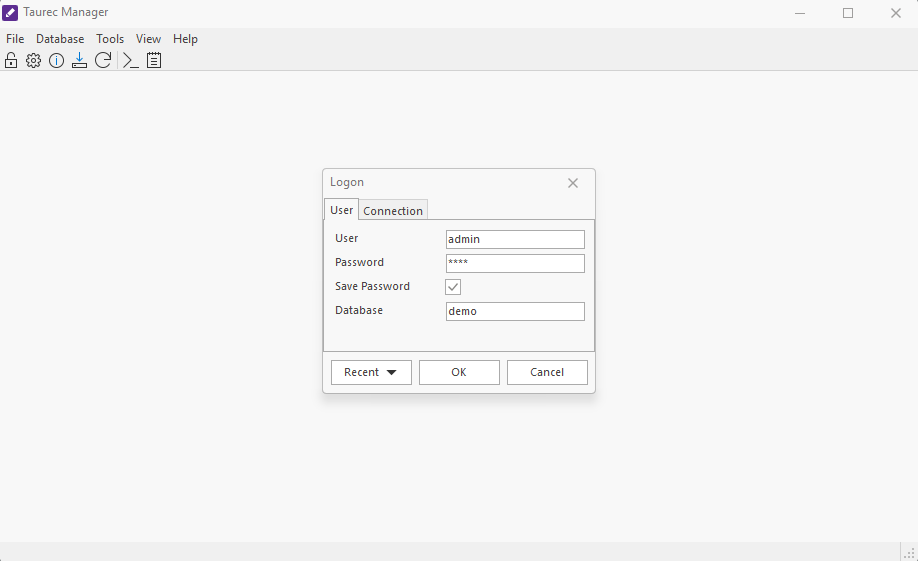
Connect to Database
Manager GUI
Code
The Connect API command can be used to connect to a database. For greater convenience, the logon method of the client instance provided by the libraries automatically updates the client authorization headers with the credentials returned by the connect command.
sh
SERVER_URL=http://127.0.0.1:8700
API_URL=${SERVER_URL}/api

CONNECTION_UID=$(curl -s ${API_URL}/connect \
-d @- <<EOF | jq -r '.result.records[0][1]'
{
  "Database": "demo",
  "User": "admin",
  "Password": "demo"
}
EOF
)
echo "Connected to demo database on server $API_URL with connection UID $CONNECTION_UID"
Show Dimensions
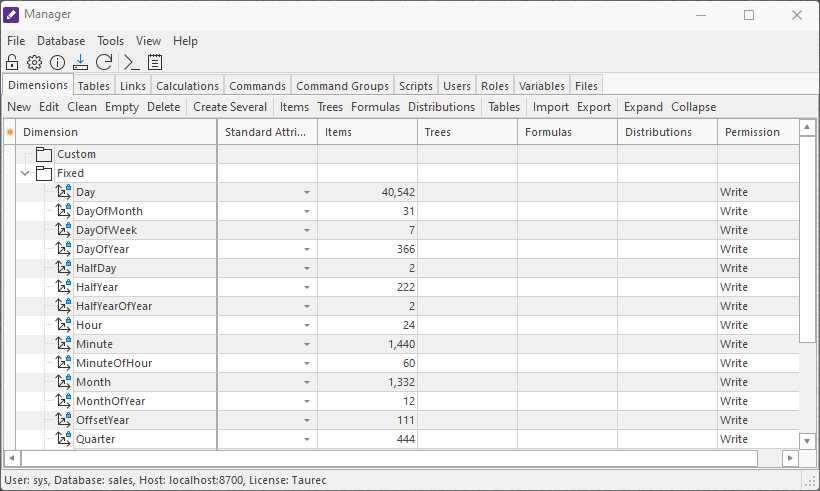
The database contains mostly empty content. However, a set of fixed time/date dimensions have been created by default for convenience.
Manager GUI
Code
The dimensions can be checked via the API command Show Dimensions.
sh
curl -s ${API_URL}/showDimensions \
    -H "Authorization: UID $CONNECTION_UID" \
    -H "Accept: application/formatted+json" \
    -d ""
Create Dimensions
The following new custom dimensions should be created:
| Name | Description |
|---|---|
| Customer | The customer that buys the product |
| Region | The region the customer lives in |
| Key Accounter | The key accounter |
| Product | The product that is to be sold |
Manager GUI
The Custom row of Dimensions should be selected, and New can be clicked in the toolbar. 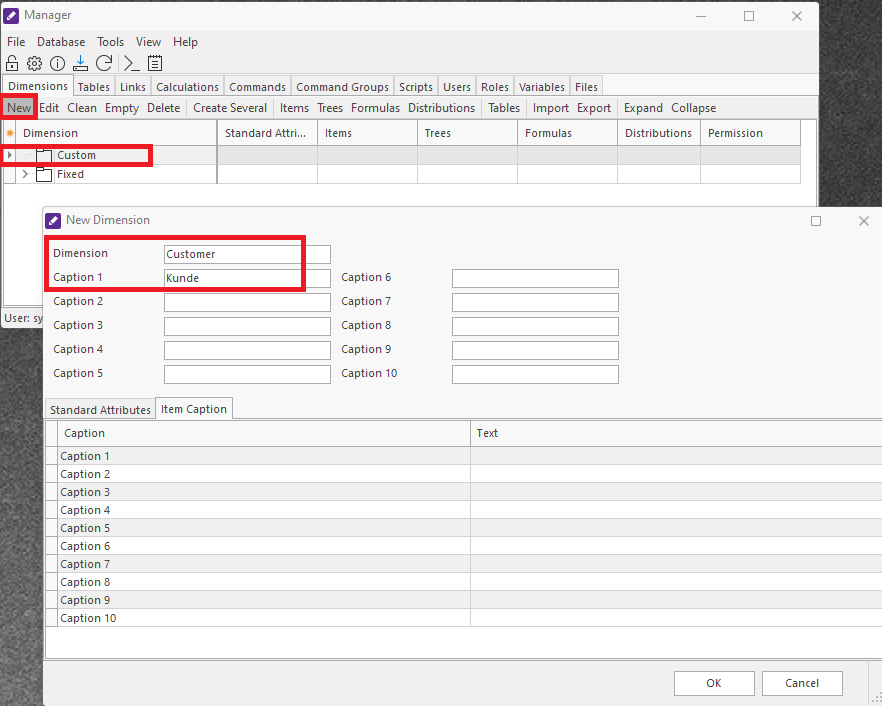
This process is repeated for all dimensions given in the table. 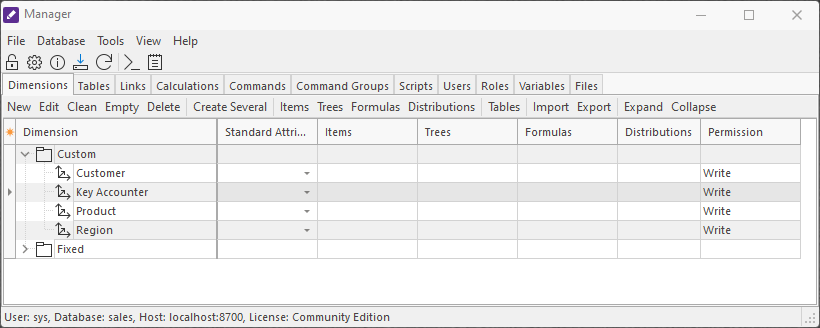
Code
The CreateDimensions API command can be used to create multiple dimensions.
sh
curl -s ${API_URL}/createDimensions \
    -H "Authorization: UID $CONNECTION_UID" \
    -d @- <<EOF
{
    "Dimension": [
        "Customer.Kunde",
        "Region.Region",
        "Key Accounter.Verkäufer",
        "ValueType.Wertart"
    ]
}
EOF
To create a dimension with StandardAttributes in addition to name and captions, the API method CreateDimension needs to be used which operates on a single dimension only.
sh
curl -s ${API_URL}/createDimension \
    -H "Authorization: UID $CONNECTION_UID" \
    -d @- <<EOF
{
    "Dimension": "Product",
    "Caption1": "Produkt",
    "StandardAttribute": [
        "Color",
        "Size"
    ]
}
EOF
Create Tables
The following tables will be created, consisting of values that depend on the dimensions:
| Table | Description |
|---|---|
| sales | contains sales data like turnover, costs and profit |
| costs | contains product costs |
Create the Sales Table
The sales table can be created with dimensions Month, Region, Key Accounter, Customer and Product by selecting the tab Tables and clicking New in the toolbar. Dimensions can be selected via drag and drop from the left window. The order of the dimensions can be changed (which affects performance) using the Up/Down toolbar buttons.
Manager GUI
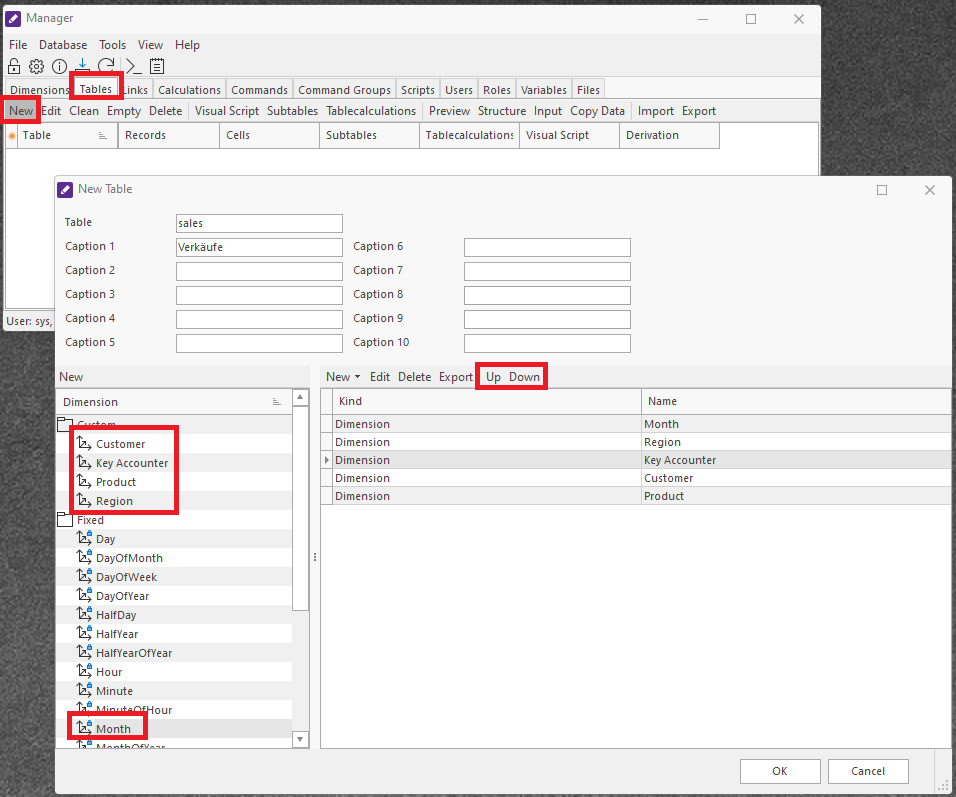
Next, the number values TurnoverPerUnit, TurnoverTotal, CostsPerUnit, CostsTotal, ProfitPerUnit and ProfitTotal should be created. This is done by selecting New > Numbers in the toolbar.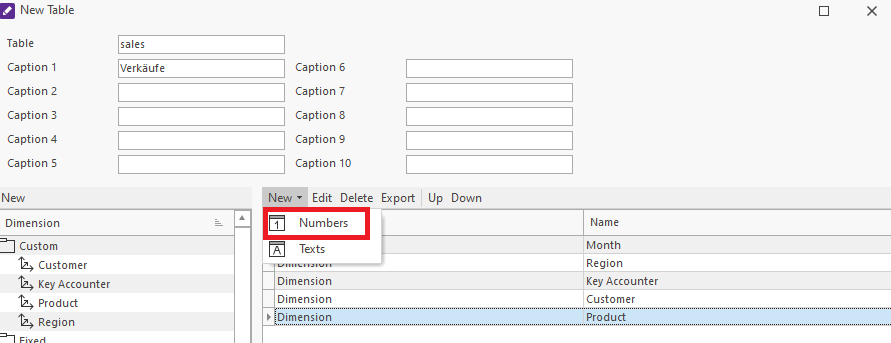
All columns can be input at once in the text input box. 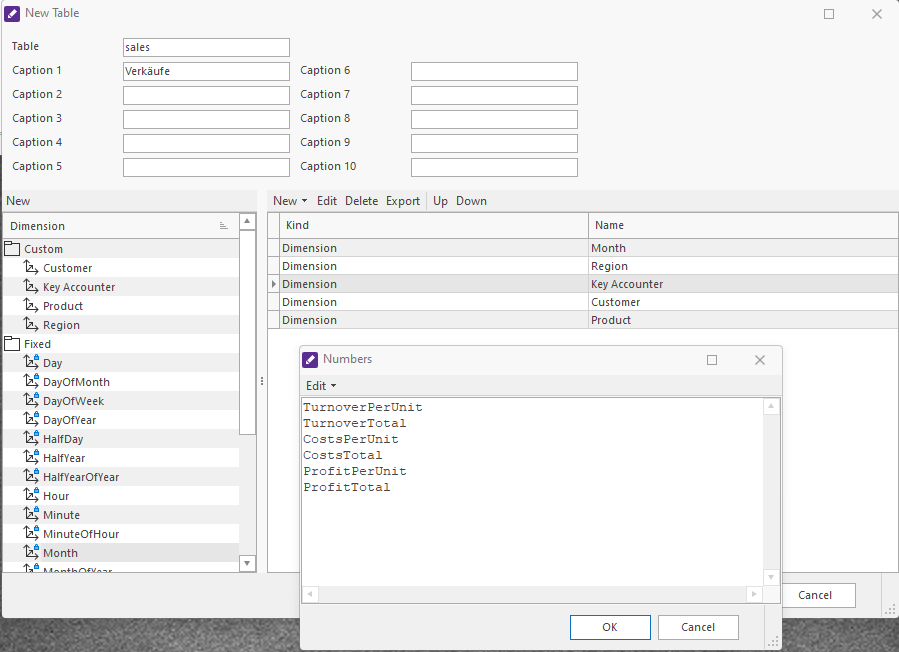
An additional text value Comment can then be created by selecting New > Texts. 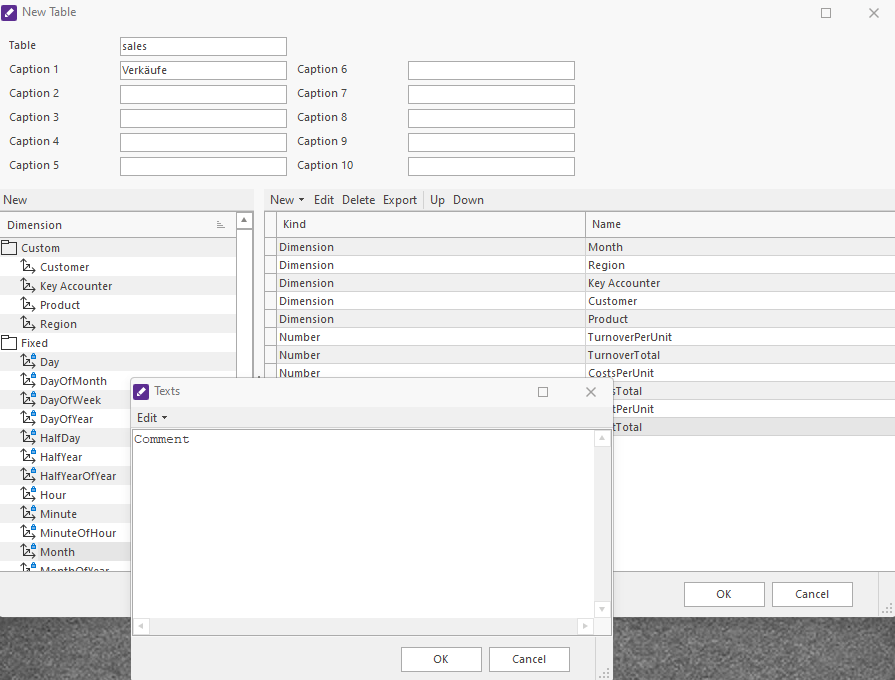
After closing the table definition window with Ok, the new table sales is displayed and can be edited by clicking the toolbar button Edit. A new number column Amount can be added and positioned as the first double value. 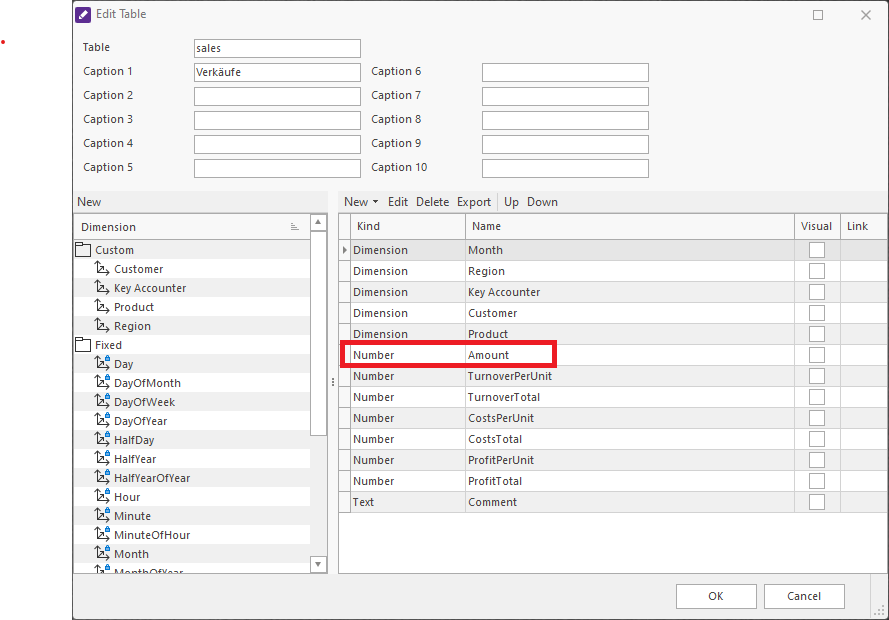
Code
Tables can be created using the API command CreateTable.
sh
curl -s ${API_URL}/createTable \
    -H "Authorization: UID $CONNECTION_UID" \
    -d @- <<EOF
{
    "Table": "sales",
    "Caption1": "Umsatz",
    "Dimension": [
        "ValueType",
        "Month",
        "Region",
        "Key Accounter",
        "Customer",
        "Product"
    ],
    "Double": [
        "Amount",
        "TurnoverPerUnit",
        "TurnoverTotal",
        "CostsPerUnit",
        "CostsTotal",
        "ProfitPerUnit",
        "ProfitTotal"
    ],
    "String": ["Comment"]
}
EOF
Create the Costs Table
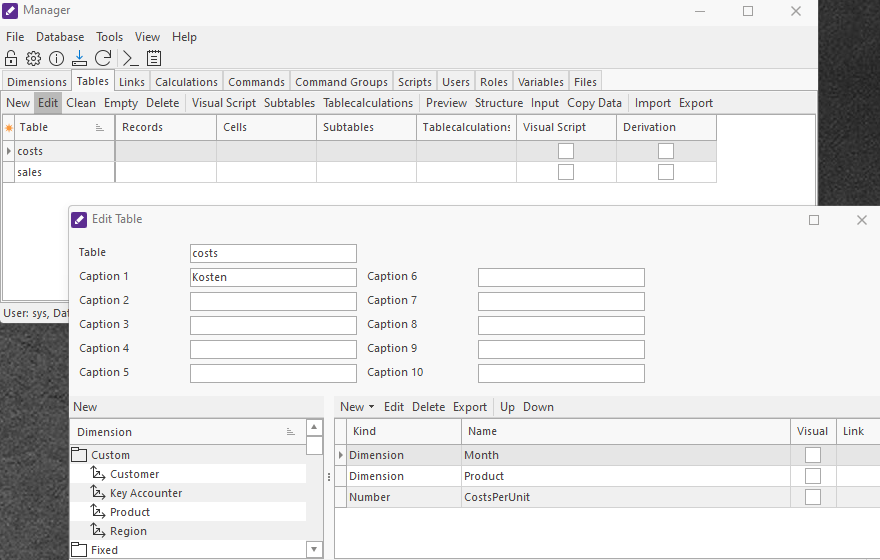
The costs table should be created containing the product costs. It has dimensions Month and Product and a double value CostsPerUnit.
Manager GUI
Code
sh
curl -s ${API_URL}/createTable \
-H "Authorization: UID $CONNECTION_UID" \
-d @- <<EOF
{
"Table": "costs",
"Caption1": "Kosten",
"Dimension": [
"ValueType",
"Month",
"Product"
],
"Double": ["CostsPerUnit"]
}
EOF
show_table_costs=$(curl -s ${API_URL}/showTable \
-H "Authorization: UID $CONNECTION_UID" \
-H "Accept: application/formatted+json" \
-d @- <<EOF
{
"Table": "costs"
}
EOF
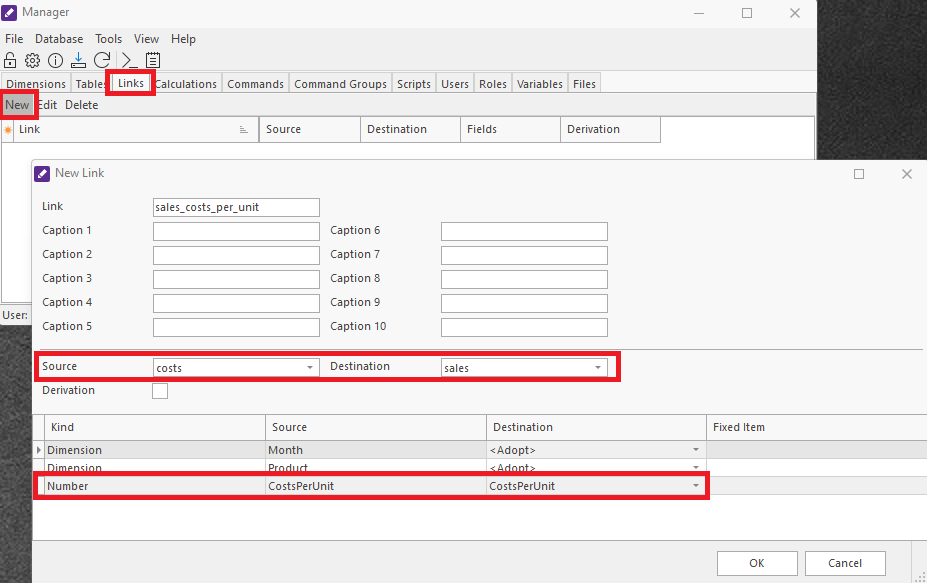
)Link Tables
The product costs per unit column can be connected to the CostsPerUnit column in the sales table via a link. This ensures that changes to the product costs are automatically reflected in the column in the sales table.
Manager GUI
Code
The API command CreateLink can be used to create links between tables.
sh
curl -s ${API_URL}/createLink \
-H "Authorization: UID $CONNECTION_UID" \
-d @- <<EOF
{
"Link": "sales_costs_per_unit",
"Source": "costs",
"Destination": "sales",
"Field": ["CostsPerUnit.CostsPerUnit"]
}
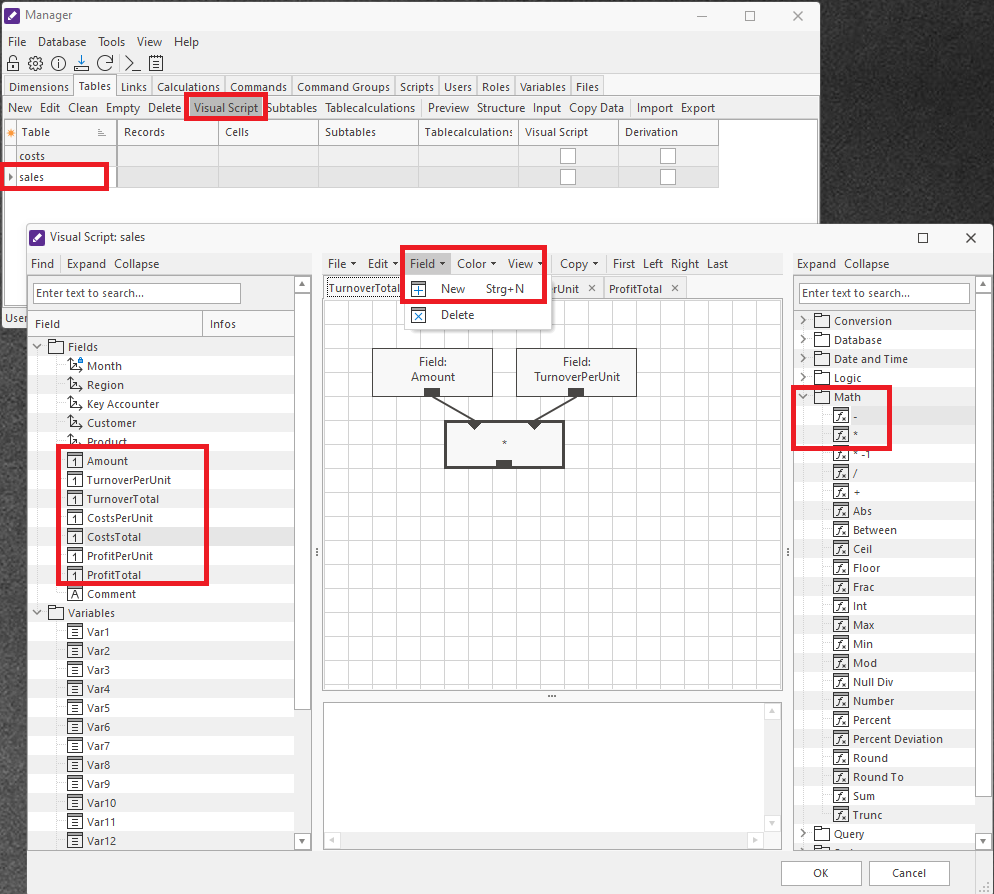
EOFAdd Visual Scripts
A visual script will be created on table sales to define the following calculated columns.
| Name | Calculation |
|---|---|
| TurnoverTotal | Amount * TurnoverPerUnit |
| CostsTotal | Amount * CostsPerUnit |
| ProfitPerUnit | TurnoverPerUnit - CostsPerUnit |
| ProfitTotal | TurnoverTotal - CostsTotal |
Manager GUI
Code
The API command SetTableVisual can be used to create visual scripts that define calculated columns in a table.
sh
curl -s ${API_URL}/setTableVisual \
    -H "Authorization: UID $CONNECTION_UID" \
    -d @- <<EOF
{
    "Table": "sales",
    "VisualScriptDatabase": [
        {"Group": "TurnoverTotal", "Text": "Mul(Field(Amount), Field(TurnOverPerUnit))"},
        {"Group": "CostsTotal", "Text": "Mul(Field(Amount), Field(CostsPerUnit))"},
        {"Group": "ProfitPerUnit", "Text": "Sub(Field(TurnoverPerUnit), Field(CostsPerUnit))"},
        {"Group": "ProfitTotal", "Text": "Sub(Field(TurnoverTotal), Field(CostsTotal))"}
    ]
}
EOF

show_table_sales=$(curl -s ${API_URL}/showTable \
    -H "Authorization: UID $CONNECTION_UID" \
    -H "Accept: application/formatted+json" \
    -d @- <<EOF
{
    "Table": "sales"
}
EOF
)
echo "$show_table_sales"
Save Changes
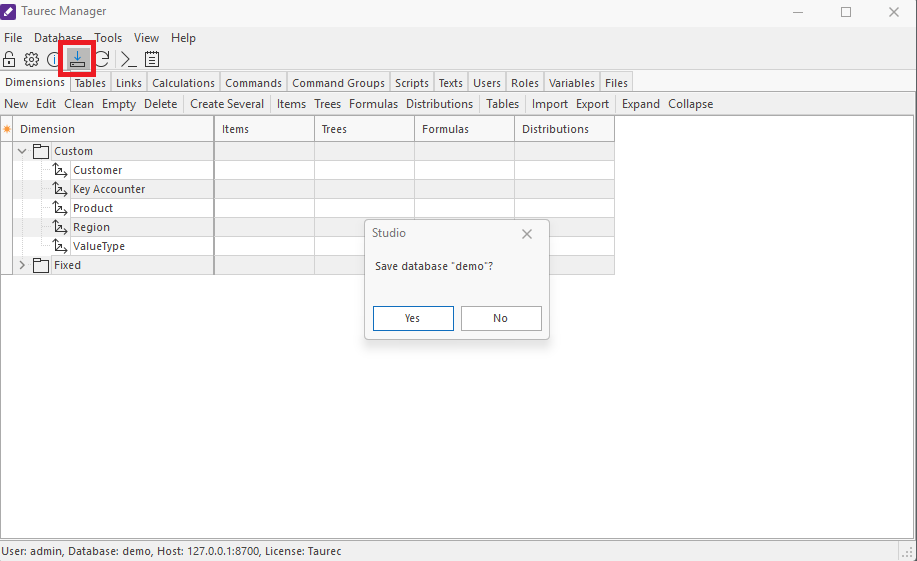
After these structural changes, the database should be saved to prevent loss of changes when the server is stopped.
Manager GUI
Code
The API command SaveDatabase can be used to save the database to disk.
sh
curl -s ${API_URL}/saveDatabase \
    -H "Authorization: UID $CONNECTION_UID" \
    -d ""
Add Data
With the basic structure of the database set up, data can be added to the dimensions and tables.
Add Dimension Items
Since the dimension region consists of only four items, they can be input manually.
Manager GUI

Code
The API command CreateItems can be used to create items in an existing dimension.
sh
curl -s ${API_URL}/createItems \
    -H "Authorization: UID $CONNECTION_UID" \
    -d @- <<EOF
{
    "Dimension": "Region",
    "Item": [
        "North.Nord",
        "South.Süd",
        "West.West",
        "East.Ost"
    ]
}
EOF

curl -s ${API_URL}/createItems \
    -H "Authorization: UID $CONNECTION_UID" \
    -d @- <<EOF
{
    "Dimension": "ValueType",
    "Item": [
        "actual.Ist",
        "plan.Plan"
    ]
}
EOF

curl -s ${API_URL}/createItems \
    -H "Authorization: UID $CONNECTION_UID" \
    -d @- <<EOF
{
    "Dimension": "Product",
    "Item": [
        "tablet",
        "laptop1",
        "laptop2",
        "desktop",
        "server",
        "phoneS",
        "phoneL"
    ]
}
EOF
Import Data From a File
The data for the sales table can be imported from a file sales.tsv that contains data in tab-separated format. This is a common use case in addition to import via direct database connection as provided by the Studio application. To import a file on the server, it must first be uploaded to the server.
Code
The API command SetFile can be used to upload a file in base64 encoding.
sh
content="[$(base64 ./resources/sales.tsv | fold | awk '{print "\""$0"\""}' | paste -sd, -)]"
curl -s ${API_URL}/setFile \
    -H "Authorization: UID $CONNECTION_UID" \
    -d @- <<EOF
{
    "File": "sales.tsv",
    "Base64": true,
    "Overwrite": true,
    "Text": $content
}
EOF
The API command ImportTable can then be used to import the uploaded file into the table sales.
TIP
Files are saved on the server in the "files" subfolder of the database folder. The API command ShowDatabase can be used to retrieve that folder.
sh
db_folder=$(curl -s ${API_URL}/showDatabase \
  -H "Authorization: UID $CONNECTION_UID" \
  -H "Accept: application/field+json" \
  -d "" | jq -r '.result.records[0][] | select(.field == "Directory") | .value'
)
# replace \ in path by / for compatibility with json
db_folder="${db_folder//\\//}"
sales_file_path="$db_folder/Files/sales.tsv"
curl -s ${API_URL}/importTable \
    -H "Authorization: UID $CONNECTION_UID" \
    -d @- <<EOF
{
    "Table": "sales",
    "File": "$sales_file_path",
    "Headers": 1,
    "CreateItems": true,
    "DecimalSeparator": "Point",
    "FieldSeparator": "Tabulator",
    "ThousandSeparator": "Comma",
    "Dimension": [
        "ValueType.[Fixed].actual",
        "Month.Column1",
        "Region.Column2",
        "Customer.Column3",
        "Key Accounter.Column4",
        "Product.Column5"
    ],
    "Field": [
        "Amount.Column6",
        "TurnoverPerUnit.Column7"
    ]
}
EOF


show_table_sales=$(curl -s ${API_URL}/showTable \
    -H "Authorization: UID $CONNECTION_UID" \
    -H "Accept: application/formatted+json" \
    -d @- <<EOF
{
    "Table": "sales"
}
EOF
)
echo "$show_table_sales"
Code
The same process can be repeated for the costs data file costs.tsv. However, the file endpoint should be used instead of the file API command to upload the file.
The file can be uploaded as follows:
sh
costs_file_path="$db_folder/Files/costs.csv"
curl -s "${SERVER_URL}/file?file=costs.csv&overwrite=true" \
-H "Authorization: UID $CONNECTION_UID" \
--data-binary @./resources/costs.tsv
Then the uploaded file can then be imported into the costs table:
sh
echo $(curl -s ${API_URL}/importTable \
    -H "Authorization: UID $CONNECTION_UID" \
    -H "Accept: application/formatted+json" \
    -d @- <<EOF
{
    "Table": "costs",
    "File": "$costs_file_path",
    "Headers": 1,
    "CreateItems": true,
    "DecimalSeparator": "Point",
    "FieldSeparator": "Tabulator",
    "ThousandSeparator": "Comma",
    "Dimension": [
        "ValueType.[Fixed].actual",
        "Month.Column1",
        "Product.Column2"
    ],
    "Field": ["CostsPerUnit.Column3"]
}
EOF
)
TIP
The database is not saved automatically after imports. Thus, in case something went wrong with the import, the database can be restored from the last saved state via the API command ReloadDatabase.
If everything was successful, the database should be saved as described in section Save Changes.